| Submission Procedure |
Microworlds for Teaching Concepts of Object Oriented Programming
(Jodrey Sience of Computer Science, Acadia University, Canada ivan.tomek@acadiau.ca) Abstract: We present two examples of microworlds built into the Smalltalk environment for the purpose of teaching the main concepts of object oriented programming (OOP) and of the Smalltalk programming language. Thee distinguishing features of our microworlds are that each of them presents the student with a sequence of environments. These environments introduce one OOP concept after another, and disclose the Smalltalk environment and language in a step-by-step fashion. The starting environment does not require any programming and does not encourage the user to use Smalltalk tools, the last environment must be programmed in Smalltalk and discloses the major Smalltalk tools. The intended use of our microworlds is for the introductory part of a course on OOP, to be followed by a detailed presentation of the language. An extension of the presented approach would make the method suitable for teaching basics of computer programming in a computer literacy course. Keywords: Microworld, object oriented programming, progressive disclosure, Smalltalk, teaching object oriented programming, computer literacy. 1 Introduction
The idea of using microworlds to teach selected aspects of programming is not new. The most prominent reference is probably that of Papert who used this concept in the Logo programming environment [Papert 80]. Others then used it to create environments to teach general programming principles with special programming languages [Pattis 81]. [Tomek 83], or subsets of full-fledged programming languages such as Pascal [Tomek, Muldner 86] and Smalltalk [Alvarez et al. 95], [Borne 91], [Leonardi et al. 94]. For a recent survey of the subject see [Brusilovski et al. 94]. The two main justifications for restricted programming environments are: 1. Hiding the richness of the full environment so as not to distract the beginner with too many details, tools, and techniques, and to make learning easier. This is the main motivation for building microworlds for students who want to learn to program. 2. Creating an environment which presents the student with more interesting tasks than commercial programming languages. This is an important motivation for building microworlds for students who want to learn about programming. The motivation for the work presented in this paper belongs mostly into the first category since the immediate use of our microworlds is in a course on object oriented programming (OOP). However, our microworlds are simple and interesting enough that they could be used as a starting point for audiences in the second category as well, for example with students in computer literacy courses. 2 Goals and guiding principles
Our work is guided by two main goals: First, to provide a hands-on interactive environment for presenting principles of OOP. At present, all existing textbooks introduce principles of OOP using verbal descriptions of situations that provide OOP motivation and set stage for their abstract presentation. We do not think that this is a necessary or the best approach, and believe that suitable microworlds can illustrate the concepts in a more forceful and convincing way, We also think that by manipulating appropriate microworlds, students will internalize OOP concepts better than if they are only presented with theoretical Page 423 arguments. Second, OOP environments in general, and Smalltalk in particular, are too complex to be presented all at once and their facilities should be disclosed one after another. A series of Smalltalk environments which introduces the environment progressively seems to be a good way to protect the student from the cognitive overload caused by the richness of the language and the tools. Given this motivation, we propose that the following principles should be used to design the microworlds: - The student should have access to several different kinds of microworlds. This will provide variety for exercises and reinforce the concepts by presenting them in different contexts. - Each microworld should provide motivation for the goal being pursued. In our case, the goal is to introduce OOP concepts and our choice of microworld themes is biased towards situations in which the concepts of objects and messages are as natural as possible. - Microworlds should be interesting. The student should be tempted to use them and explore their possibilities, and thus absorb the concepts that we want to communicate. - Microworlds should be simple. They must engage the student's interest but not lead him away into an exciting virtual reality world in which the learning goal is forgotten and the microworld itself becomes the focus of attention. - Microworlds should form a sequence of environments patterned on the same pedagogical subgoals. As example, version 3 of each of the microworlds designed for a particular goal should be oriented towards presenting the same concepts and use a similar user interface. This makes it easier for the student to move between the different microworlds with ease and explore the same concepts in different contexts. - The sequence into which the microworlds are divided should start at the most trivial level and proceed in small increments as far as desirable, but not farther. In the following sections, we will describe how we applied these principles in our microworlds. 3 Types of Microworlds Implemented, Stages of Their Development
Since our goal is to introduce principles of OOP, we attempted to select worlds in which objects and actions performed on them are very natural. Our first choice was a rudimentary variation on Papert's Logo Turtle - a pen world containing essentially only two types of objects: a pen for creating bit-mapped drawings, and an eraser for erasing them. As we developed this world into a series of environments and matched them with the concepts that we wanted to introduce, we found that the pen world does not provide enough justification for the concept of polymorphism. We thus added a new microworld called the geo world which consists of rectangles and ellipses that can be painted on a drawing pad, and a collector object that can be used to select and group rectangles and ellipses previously placed on the pad, and send messages to them. We will explain and illustrate the two microworlds later. The stages into which we decided to divide our microworld exposition are dictated by the topics which we want to introduce - a combination of general OOP concepts, principles of Smalltalk, and the main tools of the Smalltalk environment. These concepts, the order in which we introduce them, and a briefjustification of the order of presentation are as follows: 1. To achieve anything in an object-oriented world, the user must select objects and send them messages. To do this, the user does not have to write programs. Instead, he can click buttons representing object factories that create objects, buttons representing previously created objects, and buttons corresponding to messages understood by the selected objects. 2. Object factories are properly called classes and when we use them in a programming language such as Smalltalk, their names must follow certain rules. Names of messages must also follow rules. The names of buttons in an environment corresponding to this stage are changed to reflect these conventions, everything else can remain the same. Page 424 3. Selecting objects and sending them messages is the principle of OOP. In restricted contexts such as our microworlds, these actions can be accomplished by clicking buttons. In the general Smalltalk environment, however, specification of objects and sending of messages is achieved by writing textual programs. To provide a preliminary taste of what OOP is like in Smalltalk, we extend the user interface of the existing environment by adding a read-only text subview. We use this text view to display a preliminary form of Smalltalk statements that would have the same effect as clicking buttons. As the user clicks buttons, the corresponding statements are automatically created and displayed. The form of the displayed statements follows the rules of Smalltalk but the statements are not executable because they are not complete - we have not yet introduced the concepts of variables, assignment statement, and declaration, 4. Experience with the environment from stage 3 makes it obvious that its preliminary form of programming does not provide enough control. This provides a justification for introducing the concepts of variable, declaration, and assignment statement. Introducing these concepts allows us to create and display executable Smalltalk code fragments as the user clicks buttons to select message receiver objects, and messages. The text view is still a read-only view and the user cannot write programs but the programs are real, a preview of the programs that the student will eventually write when the 'crutch' of buttons is removed in a more advanced version of the world. 5. So far, we concentrated on one aspect of objects - their ability to execute messages. We ignored their properties, the fact that objects have internal variables capturing their current state, and that these variables may change during the object's lifetime. The previous worlds provided strong hints that this is so but we have not said this explicitly and we have not provided any means for examining the objects. At this stage of evolution of our microworld, we add a button to display properties of the selected object in an informal style - as English phrases. 6. Up to this point, our environments were artificial grafts on Smalltalk and the student did not have to use any of the standard Smalltalk tools. Even though the standard tools were not hidden from the window, we did not encourage the student to use them. All the work was done with buttons, all text was automatically created, the student could not get into problems, there was no possibility to make a mistake and no need to go outside of the pre-defined world. At this stage, we remove all this scaffolding, or most of it, and ask the student to start controlling the microworld by writing and executing Smalltalk programs. This should not be too difficult because the student has already seen what these programs look like and can even go back to a previous environment to generate the required code by clicking the buttons. Since control is now via Smalltalk code, the user is exposed to mistakes and we thus introduce principles of dealing with mistakes and the use of the debugger. We also replace the informal presentation of object properties with the formal style used by the Smalltalk 'inspector'. 7. No additional artificial microworlds are needed and we now present the Smalltalk browser to introduce the concept of class hierarchy. We still use the environment from the previous stage but only to demonstrate that the character of some of the objects already present in it quite naturally leads to subclassing, and so on. We also use the browser to create new methods and new classes of objects to demonstrate the use of the browser for creating code. When the student reaches this point, he has been introduced to all essential OOP concepts and used them actively. He has also seen and used the elements of the language, and used the tools. He is now ready to study the language itself and we proceed to teach it in the usually way starting with basic data types, control of flow of execution, I/O via the built-in user interface builder, and so on. 4 The Microworlds
In this section, we will illustrate the principles outlined in the previous sections on examples of two microworlds implemented in VisualWorks, a popular variet of Smalltalk manufactured by ParcPlace [ParcPlace 94]. Most of the illustrations are taken from the pen world but the last one is from the geo world which was designed specifically to illustrate polymorphism for which we did not consider the pen Page 425 world sufficient. Our presentation follows the sequence followed in our course. We start by showing how the student opens the microworld and proceed through individual stages of microworld evolution. It should be noted that the seven consecutive stages listed in the previous section are grouped into five stages of microworld evolution; they are illustrated in the following paragraphs. When the user opens VisualWorks Smalltalk (abbreviated below as VW) the visual launcher shown in Figure 1 appears on the screen. This launcher is identical to that provided by VW except for the new MicroWorlds command at the rightmost end of the menu bar. This reflects our belief that microworlds should be a tool helping the student to penetrate into OOP concepts and Smalltalk, but that the student should not be prevented from exploring Smalltalk further if he wishes to do so. When the student activates the MicroWorlds command, two subcommands become available, one providing access to pen worlds, the other to geo worlds. Each of them further expands to allow the user to access one of the sequence of five evolutionary stages of the selected microworld. As we have mentioned before, the two worlds evolve through parallel stages (pen world 1 - geo world 1, pen world 2 - geo world 2, and so on), presenting the same concepts and providing the same user interface, each illustrating the current stage of evolution in a different context.
Figure 1: Opening state of Visual Works Smalltalk with MicroWorlds command added. - If the user selects pen world 1, the window shown in Figure 2 appears on the screen.
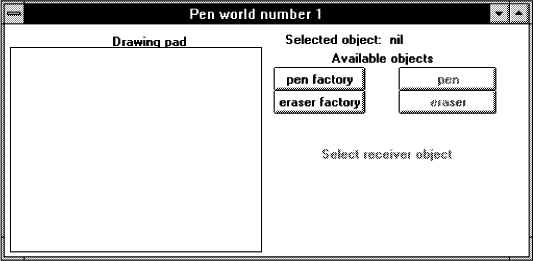
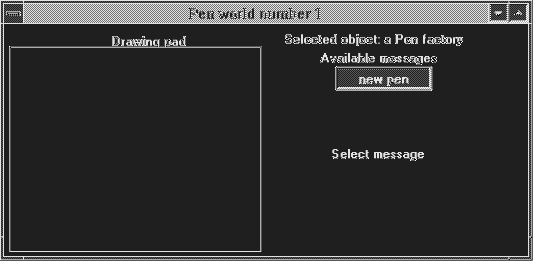
Figure 2: Initial state of pen world window. User must now select a receiver object by clicking its button. The new window is labeled with the name of the microworld and has the following components: - A rectangular drawing pad on the left. All actions taken by the student in this and the following microworlds - drawing by pen objects and erasing by eraser objects - are directed towards this pad. - Buttons for selecting objects. The goal of our interface is to drill the fact that all actions in an object oriented microworld consist of selecting objects (message receivers) and messages. At this stage, only Page 426 the pen factory and eraser factory buttons are enabled; pen and eraser buttons are disabled because no pen or eraser objects have been created so far. - A help button is present in all microworld windows. - A conspicuously colored label advises the student to select a receiver object. A label at the top shows that no object is selected, We use the Smalltalk term nil - again a part of our strategy of introducing the concepts of Smalltalk progressively whenever there is a good opportunity. Assuming that the student clicked the pen factory button, the window now changes to that shown in Figure 3. Object buttons are gone and the label at the top right states that the selected object is a pen factory; buttons showing all messages available for this object are displayed. In this case, only one button labeled new pen is shown because this is the only message understood by a pen factory. The user is prompted to select a message for the current receiver.
Figure 3: Pen factory has been selected and its messages are displayed. Student will now one by clicking. After clicking new pen, a pen object is created and the window changes to a state similar to that in Figure 2, except that the pen button is now enabled; the eraser button remains disabled, We do not show this window because it is almost the same as in Figure 2.
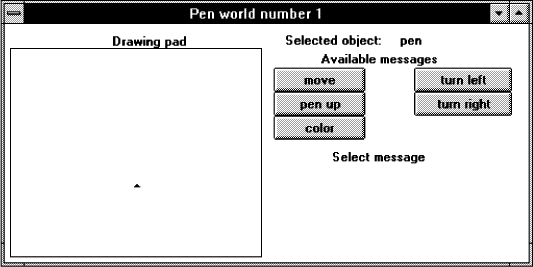
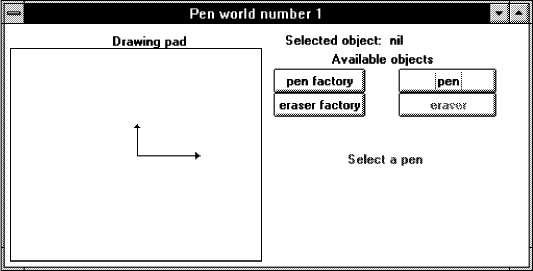
Figure 4: Student selected pen and buttons for all messages understood by pen are displayed. Page 427 Assume that student now selects the pen object by clicking the pen button. The window changes to the state shown in Figure 4. The label shows that the selected object is a pen, and buttons corresponding to messages understood by pens are displayed. They include move to move the pen by a specified number of pixels in the current direction and draw a straight line, turn left and turn right to turn the pen by +90 or -90 degrees (the pen has orientation), pen up (to lift the pen and thus cancel drawing while moving), and color to change the color of the line drawn by the pen. The pen is shown in the drawing pad in its default state - at the center of the drawing pad, pointing up, black, and ready to draw. To further illustrate the interface, assume that the student has created another pen, turned one of the two pens right, and moved each pen by an amount specified via a dialog originated when the move button is clicked. The next task is thus to select the receiver of the next message. Assume that the student chooses pen by clicking the pen button. Since there are two pens in the pad now, the student must now select one of the two pens shown in the drawing pad by clicking it. The state of the pen world window at this point is as in Figure 5.
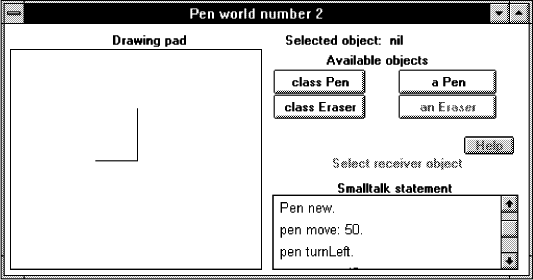
Figure 5: Student clicked the pen button and must select one ofthe two pens present on the drawing pad. The operation of pen world 1 should now be obvious and it is clear how it implements the goal of introducing the student to the concepts of objects, messages, message creation, and the fact that all action in object oriented worlds consist of selecting an object, and sending a message to it. The next stage in our of pen world evolution is pen world 2. Its user interface is very similar to that of world 1 with the following exceptions (Figure 6): - Labels on buttons are changed to introduce the terminology and the rules used in Smalltalk. Instead of calling an object button pen factory, we now use the term class pen, instead of calling a message button turn left we now call it turnLeft (not shown), and so on. We use the proper Smalltalk syntax and the actual names of messages as declared in our microworld classes. - A read-only text view is added at the bottom right. This text view shows a preliminary form of Smalltalk statements equivalent to actions performed by the user by clicking buttons. This view is scrollable and the part displayed in our illustration shows that the students has created a new pen (unary message new with no arguments), moved it by 50 pixels (keyword message move: with one argument), created another pen and turned it left (using turn Left - another unary message). The message move: 50 gives us an opportunity to note that everything in Smalltalk is an object, including the argument 50 which is a number object. (The state of the drawing pad in Figure 6 shows that more messages must have been executed to reach this stage - these are hidden in the text view and would be accessed by scrolling it.) Page 428 The text view of pen world 2 shows only a preliminary form of Smalltalk statements although the syntax is correct. Situations such as the one shown give us an opportunity to justify the need to refer to objects by names (which of the two pens in our example should turn left?) and this leads to the concept of object identifiers, declaration, and assignment statement. This new feature is introduced in pen world 3.
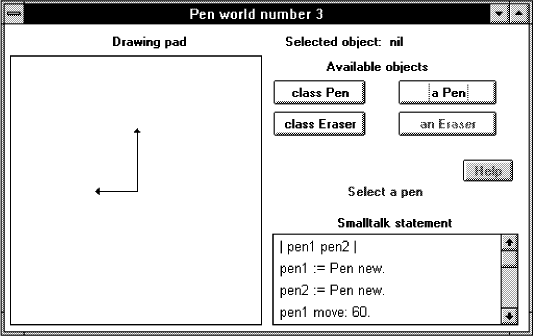
Figure 6: When student selects receiver and message in pen world 2, the text view displays a preliminary form of the Smalltalk equivalent of the button-based operation. The interface of pen world 3 (Figure 7) is identical to that of pen world 2 but the automatically generated displayed Smalltalk code is now realistic - identical to that which would produce the same effect as button clicks. The text view is still read only and the user thus cannot program the world in Smalltalk, but he can observe the Smalltalk code equivalent to button clicks.
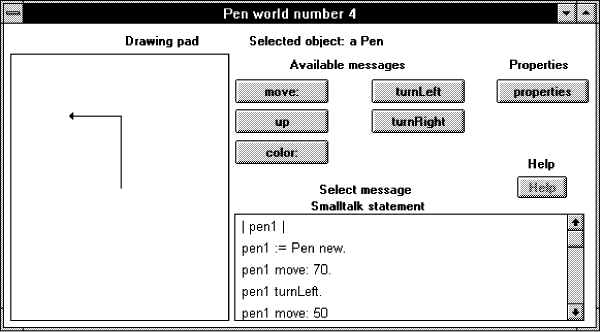
Figure 7: Pen world 3 shows Smalltalk code equivalent to user actions in a read-only view. Page 429 The way in which we introduced the concept of an identifier in pen world 3 is very limited - an identifier in our current sense is just a pointer to an object such as a pen or an eraser, and an object is something that understands messages. This is because we have not yet considered the fact that objects have properties which can change and that the nature of objects is thus variable. From our experience it is, however, obvious that at least some of the objects that we use are more than mere message executors. As an example, as the student sends messages to a pen, its position, orientation, color, and drawing state (up or down) must change. This gives us an opportunity to enrich the concept of an identifier and an object, and introduce the concept of a variable - an identifier of an object whose internal properties may vary during its lifetime. To introduce these concepts is the role of pen world 4 which adds a properties button to the interface of pen world 3 (Figure 8).
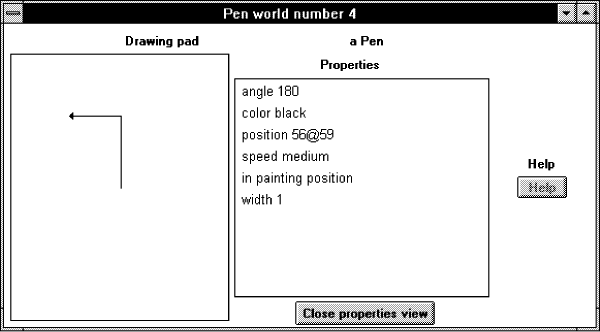
Figure 8: Pen world 4 allows the student to examine properties ofobjects using the properties button. When the student selects an object and clicks the properties button, the window changes (Figure 9) to show the properties of the selected object. The properties are listed in an informal way. We think that pen worlds 1 to 4 have introduced enough of the basic concepts for our overall goal, and that the student is now ready to move to Smalltalk and start programming using text. (In a different setting, such as a computer literacy course, this may not be so and we may want to introduce additional environments.) Still, a few concepts and some preliminary practice are desirable before we start teaching the Smalltalk language and we thus present one last stage in which we will expose the student to several more concepts and introduce him to the tools of the Smalltalk environment. This is the role of pen world 5. Page 430
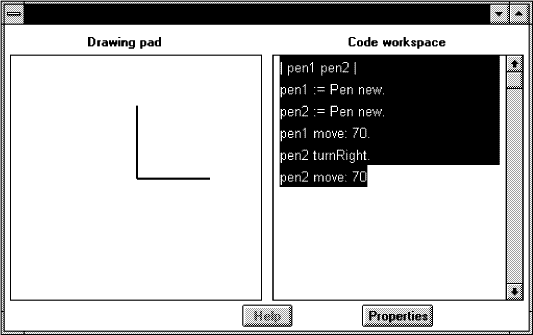
Figure 9: Clicking the properties button in pen world 4 shows properties of the selected object. In pen world 5, control by clicking buttons is replaced by programming. Object selection buttons and message selection buttons are removed and are replaced by a read-write text view into which the user enters Smalltalk text and executes it in the usual Smalltalk way - by selecting the text (Figure 10) and activating the do it command from the pop up menu associated with the mouse button.
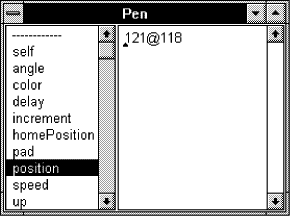
Figure 10: Pen world 5 removes object and message buttons and the student controls it by typing and executing Smalltalk code. The form of the Smalltalk statements used to program world 5 is identical to that known to the student from worlds 3 and 4, and writing the programs should thus be easy. (Moreover, if the student has Page 431 problems, he can always return to pen world 4 and have the code generated by clicking the buttons.) Still, even experts make mistakes and students will thus run into problems - both syntax and logic errors. This is a good place to show and explain the most common ones, introduce the concept of the debugger, and use it. Pen world 5 also introduces the standard operate pop up menu with its do it command (to execute selected text), text editing commands, and the inspect command. The inspect command opens the standard Smalltalk which provides access to all properties of the selected object, As an example, if the user inspects a pen object, an inspector as in Figure 11 will open, This gives us an opportunity to introduce further concepts: - Internal properties of objects are stored in named instance variables. - Values of instance variables are objects such as numbers, points, and colors. - Being objects, values of instance variables may themselves have instance variables whose values are other objects, and so on. As an example, by opening an inspector on the position object (Figure 11), we find that position is a point object which has two instance variables that can again be viewed by the inspector, and so on. This introduces the idea of objects as aggregates of other objects and further reinforces the parvasiveness of objects. - For completeness we must explain that self - the first item on the list in each inspector window - is the receiver itself and that it is a very important object in Smalltalk programs.
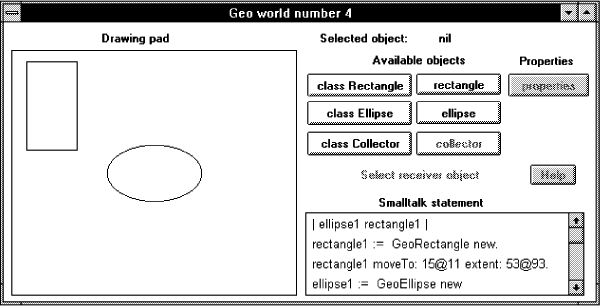
Figure 11: Smalltalk inspector on a pen object shows that pen is an aggregate object with many components. As we mentioned earlier, we do not find that pen world 5 is sufficient to introduce the one remaining essential concept - polymorphism - in a satisfactory way. In our view, students should understand polymorphism as the ability of different kinds of objects to understand the same message and respond to it in essentially the same way but in a manner appropriate to their nature. In the pen world, erasers and pens are very different objects that don't share any functionality and they are thus unsuitable to introduce polymorphism. A Pen factory and an Eraser factory both understand message new and both respond to it in the same way (create a new object) but each in its own way: A Pen factory create pens whereas an Eraser factory creates erasers. Although this is a good example of polymorphism, it is not sufficient to demonstrate its full implications. For this purpose, we thus created another microworld - the geo world. The geo world is again a drawing world but it uses pre-defined objects - ellipses and rectangles - drawn in the drawing pad. In addition, the collector object allows the user to select objects in the drawing pad and collect them into a collection, Besides the message collect, the collector also understands all messages understood by ellipses and rectangles (moving, coloring, stroking and filling) but applies them to all elements of the collection. At this point in the course, we explain that to execute a message such as stroke (changes an object to stroked rather than filled representation), the collector sends message stroke to Page 432 each element of its collection. Each element of the collection understands this message (the student had an opportunity to test this on individual ellipses and rectangles) and obeys it in the same way (converts itself to a stroked object) but ellipses clearly do this differently than rectangles. This applies to all other messages and shows how powerful polymorphism is - it allows us to deal with a variety of objects in the same way without having to distinguish between their nature, always providing the desired result - if the objects are properly defined, of course, As we mentioned before, the geo world also allows us to demonstrate the concepts presented in the pen world in a different context and possibly enrich them. As an example, the move action in the geo world is implemented by keyword message move to: extent: with two arguments (Figure 12), and so on,
Figure 12: Geo worlds are useful to present concepts from pen worlds in a different context. The collector object is a good illustration of the power of polymorpoism. 5 Conclusion
The concept of microworlds has been used by several authors in the past and we described a variation on the previous implementations. Our microworlds are intended for teaching concepts of object oriented programming and fundamentals of Smalltalk and our approach differs from previously described microworlds in the following ways: - We use several complementary worlds, each organized into an ordered sequence of stages of development. - Each sequence begins with an easy to understand intuitive world in which the student achieves the equivalent of programming by clicking buttons. - From a completely non-programming environment, our sequence evolves to display automatically generated code and eventually leads to an environment in which the user programs actions equivalent to control by buttons. - The environment progressively introduces OOP concepts, elements of the Smalltalk language, and tools of the Smalltalk environment. We have developed our microworlds for use in a course on Smalltalk for Computer Science students. Our intention is to use them only for a very short introductory part of the course and then teach the language using the full environment. As a consequence, our microworlds are simple and the amount Page 433 of language that they introduce very limited. In fact, from the point of view of the language itself, the purpose of our microworlds is mainly to show what Smalltalk looks like rather than try to teach it. In principle, however, there is no reason why our approach could not be used to present much more of the language. We think that this strategy could be useful for other audiences such as students in computer literacy courses. The Smalltalk environment or its restricted subset would be a perfect vehicle for this because it is easy to extend, and because it allows the student to proceed to study Smalltalk itself - a real and increasingly popular programming language. Our plans for the future include testing our microworlds in the classroom, modifying the user interface if this appears desirable, and creating additional microworlds to provide new demonstrations of the concepts that we want to present. We will also examine whether our division into five stages is appropriate for our purpose. References
[Alvarez et al. 95] X. Alvarez, et al.: 'Customizing learning environments for teaching object-oriented techology to different communities'; TaTTOO,95. Teaching and Training in the Techlogy Of Objects), Leicester, UK, 1995. [Borne 91] I. Borne: 'Object-oriented programming in the primary classroom,' computers and Eductaion 16 (1): 93- 98, 1991. [Brusilovski et al. 94] P. Brusilovski, A. Kouchrenko, P. Miller, I. Tomek: 'Teaching programming to novices: a review of approachs and tools'; Proceedings of ED-MEDIA 94, 103-110, 1994. [Leonardi et al. 94] C. Leonardi, et al.: 'Micro-Worlds: A tool for learning object-oriented modeling and problem solving'; Educators symposium, OOPsLA,94, 1994. [Papert 80] S. Papert:, 'Mindstorms - children, computers, and Powerful Ideas', Basic Books, Inc., 1980. [ParcPlace 94] ParcPlace. 'User Guide', 'Cookbook', 'Object Reference', manuals, ParcPlace systems, Inc., 999 E. Arques Avenue, sunnyvale, CA, 1994. [Pattis 81] R. Pattis: 'Karel - the robot, a gentle introduction to the art of programming with Pascal'; Wiley, 1981. [Tomek 83] I. Tomek: 'The first book of Josef'; Prentice-Hall, 1983. [Tomek, Muldner 86] I. Tomek, T. Muldner: 'A Pascal primer with PMS'; McGraw-Hill, 1986. Page 434
|
|||||||||||||||||

